Craftsy Unlimited FREE 7 day trial at Craftsy.com
Happy Cloud Quilt Batting by Fat Quarter Shop
Cricut is Easy as 123
Loralie Designs
Showing posts with label CCR Cricut Craft Room. Show all posts

Wednesday, July 3, 2013

Card Creating Tuesday July 2, 2013 Baby Cards with the Cricut


Today the design team was challenged to make 
Baby Themed Cards using the Cricut 


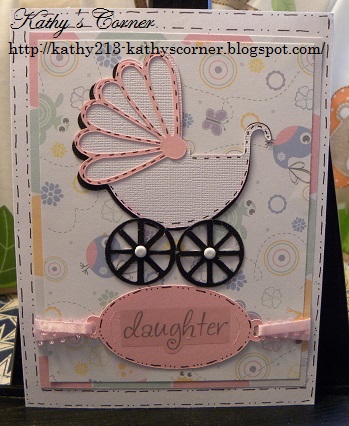
Kathy used Cricut Craft Room Exclusive Wedding Card Invite & Creative Memories - Tiny Treasures. Please visit her blog to see how she made this


Vivi J made this card using Mickey Font and Life's a Party. For details please visit her blog: http://vivijdesigns.blogspot.com/2013/06/onesie-card.html


Marilyn used Storybook and Sugar and Spice cartridges to create her baby card.  To view more images and see how this card is made, go to Marilyn's Cricut Cards.


Luisa used Baby Steps to create this diaper card. For details and instructions visit her blog: lepaperstudio.blogspot.com


580538_Holiday Banner 468 x 60


Monday, July 9, 2012

My IMAGINE-ation Monday July 9, 2012 and the letter B


The new design team members have taken over the blog... Just kidding, but they are ready to show you what they got!!! What a great way to kick off the new Design team term!!!
One has a video already ready for you!!!


Here is also the link to how to use Imagine cartridges on ANY Cricut machine!!!


Here is also a companion (similar but different) tutorial for Darla's tutorial


Head on over to Darla's blog  for a video tutorial on how
to use fonts and their shadows in the Cricut Craft Room.


Andrea used images from CCR 3D Trees to make this card.


Teresa used the Cricut Cartridge Birthday Bash to create this fun card! Please visit her blog http://www.createenjoyshare.blogspot.com/2012/07/letter-of-day-is-b.html


ClaireR used Garden Soup cartridge to create her Letter B project. To
see the complete project, please visit her blog at


Friday, January 6, 2012

~~Love Bug Banners~~ ~~Blog Hop~~

~~Love Bug Banners~~     ~~Blog Hop~~


I apologise but this was my work in progress picture..... My computer will not read my camera card (I upload from my camera almost daily, so I know I am doing it right). Now, my computer will not even read the SD drive. who knows why. I have a new computer, but it does not have Microsoft work or Photoshop. So I find myself still using the old computer. Sorry...
I already packed my banner up to ship, so I cannot take another picture of my banner, I will keep trying to get the pictures off of the disk and I will update it with the finished pretty banner. The finished banner has ribbons and sparkles and is ADORABLE... I will keep trying to get it uploaded.
I made these banners using the Cricut Craft Room and Art Philosophy and I edited the monogram feature from A Child's Year. I seem to find more and more ways to use that cartridge.
I have the files I have created and would be more than happy to share them, except I don't know how to add a file here for you to download. So if you would like the two files, please email me EricaCraftRoom@aol.com and but in the subject line- Bee Happy Banner Files and I will get them emailed out to you.


It was an oval but I wanted a circle so I just expanded the width in CraftRoom and I got exactly what I wanted.  Also I made a Bee using Sesame Street Seasons. It was an Icon with only one layer, but I wanted two layers... here are the before and after pictures of how I did that. Please scroll down for that....

My blog candy for this is the 6x6 Echo Park- YOURS TRULY paper pack that I used to make this!
Please comment to win it. Also add your email over to the right on my blog to be added to my daily email subscribers. Don't forget to follow me on facebook to see other contests, swaps, challenges and giveaways.
Erica Craft Room is my facebook name.

4.The Scrapbooking Queen~ www.thescrapbookingqueen.com/


8.Jenny (Crazy About Cricut) - http://crazyaboutcricut.blogspot.com/ /


/


In Cricut Craft Room I added two of the same BEE, I got is from Sesame Street Seasons. I loved it but it did not have a layer feature and I wanted a yellow bee with a black behind it.... so I had to make it myself....

I made one of them Yellow just so you can see it better and it will make it clear which bee I am talking about. The yellow bee is on the left and I will refer to the bee on the right as the 'black bee" In this step all I did was add color for the tutorial.

When I clicked on the black Bee a square goes around it and there is a box below it that says HIDE CONTOUR. Click the little green box on the bottom left.

Then when you hover over a line it turns red, if you want to make that line disappear when it turns red, click your mouse. It will no longer cut that line. I used this process to get rid of all of the inside lines so it would just cut a bee outline.

Here you can now see that I clicked on all of the red lines, they are now a very light grey. If I clicked on one that I didn't mean to I can always hover over it and it will turn red again and if I click it will return to my image and it will cut as normal.

On the top left of craft room I clicked EXIT on the top left of the mat. I have now returned to my main screen and it now shows me what it WILL cut.... My yellow bee and my black bee outline.

Here you can see that I flooded it with black.... just to show you when you put your paper in how it will cut.


Here I put them on top of each other to show you how it will look when you cut it with paper and then add your one bee to the top of another.
You can use this process for most images that don't have a shadow or second layer, but you want to make it into a second layer. I also used this process for the Monogram feature. The font only had one layer, but I needed two, so I just added two of them to my cutting mat and used the same process to take out the inside cuts and I made two layers.  This is a great way to really get what you want out of the bonus features on cartridges and another way to make EXACTLY what you want.
Cricut says "create what you want, where you want."
That is exactly what I did! I LOVE Cricut Craft Room!


Here is how I made my letters which were from the monogram feature key on A Child's Year.
The basic monogram feature makes and oval, but I wanted a circle, if I were to push SHIFT and the MONOGRAM key, it gives me balloons, so again I must make my own base so you do not see the patterns behind where the letter will cut out.

Here is the B oval monogram as it is on the cartridge. 

Here is the shift monogram feature... obviously this will not work as the base for my scalloped one, so I deleted it. I just added it to show you that this cartridge does NOT have a layer feature for the scallop B


Here it is as an oval.


If you touch the button I have circled, that will expand this image's width and nothing else.
After it was properly expanded and it used the little squares on the cutting mat to make sure it was a perfect circle. I then selected COPY from the toolbar at the top and then paste. If you know short hand or quick keys. Hold down CRTL and C at the same time and it will copy the image, provided it has the above grey box around it so it know what you want to copy. Then hold down CTRL and V at the same time to paste and you can see below I now have two (If you are a MAC user use the COMMAND key instead of CTRL)


now on one of them I select the HIDE CONTOUR that I have circled

I went through the process of clicking on the lines that make the letter B as I did before....

I have circled the EXIT button to push when you are done editing it.


Now once I exit, it will then show me what my cricut will actually cut.

I added color just to show you when you put colored paper on your mat this is what it will look like.

Another tip if you want to move a shape UP-DOWN, or LEFT-RIGHT Use the buttons I have circled. If you want to expand it LONGER or WIDER use the other two arrows.

I hope you enjoyed this. As a part of 2012. I will be showing you a tutorial like this EVERY Tuesday all year long.  Please leave a me a comment so I know if you like this tutorial or not.
I will also do Gypsy and other Cricut tutorials, not just CCR (Cricut Craft Room) on Tuesdays, this is just an example of one.


Tuesday, December 20, 2011

25 Days of Christmas December 19, 2011 Theme Coffee, Tea, Hot Chocolate


Today's theme is Hot Chocolate, Coffee or Tea.....

In our house I like to make little things special, it is more the traditions and memories that matter even years later..... I hope you are all making memories this year. For a special Christmas special....
I have all of the cartridges that I have in stock are either $9 or $15.... ALL of them are $15 or less and will ship in time for Christmas if they are purchased today (Tuesday)


Jenny R created these gifts with Winter Frolic and Art Philosophy.
To see more pictures and details on how these were made please visit her blog at http://myimagitivity.blogspot.com/


Heather F. created this hanging pillow box ornament with her Cricut Imagine, the Cricut Craft Room & Enjoy the Seasons. You can view more information on this project by going to her blog, http://www.papercrafteranonymous.com/


Gayle used Sesame Street Seasons and the Cricut Craft Room font and basic shapes cartridge for this layout. To see how she made it please visit, http://gscraptime.blogspot.com/


Ashley made this card. Her blog is http://theglamoroussideofscrapping.blogspot.com/
Winter Frolic cricut cartridge used.


Tonya used April Showers Cricut cartridge for this food item.


Connie W. made these hot chocolate packets using the Creative Memories Cheerful Seasons and Winter Woodland Cartridges. Please visit her blog at http://conniecancrop.blogspot.com/


Liz made this gift with Pink by Design Stamps and the Tags, Bags Boxes and More cartridge.
Please visit her blog for more: http://tryin2craft.blogspot.com/


Sherri made this card using Joys of the Season Cricut Cartridge and My Pink Stamper Winter Punnies stamp set. To see how she made this card please visit her blog at http://squeakyscrapper.blogspot.com/


Janet used Love You A Latte Lite cartridge to make this gift container.
Check out her blog to learn more! http://janetscreativeworld.blogspot.com/


Kathy made this gift card holder using Love You A Latte Cricut Lite Cartridge.
Please visit her blog to see how she made it http://3spoileddogs.blogspot.com/


Jamie L used Cindy Loo and Love You A Latte to make this Gift Card Holder.


Jennie made this card with Love You A Latte Cricut Lite Cartridge to make this project.
Please visit her blog http://jenscrapstoo.blogspot.com/


Jamie A used Christmas and  Winter Frolic  Cricut cartridges


Monday, August 29, 2011

My IMAGINE-ation Monday August 29, 2011

Each day this week I will be showing you a new tip or trick to use Cricut's CraftRoom Software...
feel free to ask questions in your comments....

Today is My IMAGINE-ation Monday.....
If you are a new follower you might be wondering what that is....
Well you do NOT need to have a Cricut Imagine to do some of our projects....
On Mondays myself and the design team use one of a few things... we either use papers that have been printed on the Cricut Imagine, OR we might use an Imagine ART cartridge and cut shapes from those cartridges, using regular printed paper that we have bought at the store.... Remember you do not have to print to cut with the Imagine.... I use my Imagine to make everything... I will put a regular cartridge (say Mickey and Friends)  in and load my printed paper and choose CUT ONLY....
Over the next few weeks I will be writing an 'editorial' per say on Mondays. I will show you some great things about the Imagine.
Over the weekend I know MANY people gained access to Cricut CraftRoom (CCR)
Today I want to talk about a GREAT feature of CCR.
I can insert a pattern into ANY shape from any cartridge. I can then decide what size I want the pattern to fill at. Here are a few pictures....

So I opened up this image from Baby Boutique.....
These were the patterns that it came in, I went to the image itself and click on it, then at the bottom of the box, it gave the option to edit group, then on the top right of this image you can see combine, separate. I click separate.... then i pick eah image on its own to fill.... Don't forget to pick the Imagine machine.... on the left go to options, then machine and you can pick IMAGINE, or whatever machine you are using.
Even if you do not have the Imagine, I recommend designing in 'IMAGINE mode' so you can see what the colors will look like together.


You can see here i filled the image on the right with a different pattern.


Then I put  different pattern in the image on the left...


Here is what it looked like after I clicked Combine on the top right... You can see there is a grey box that has two choices, WELD,     DO NOT WELD  It automatically wants to try to weld.... sometimes if you do not push the button DO NOT WELD, it will apply that pattern to both images.... It will not do this is you take part an Imagine image. but if you were to do this on the non-Imagine cartridges, and they touch it wants to automatically weld the images and what ever color or pattern is on them. You may have to click :Do not weld" and move them away from each other and then fill them with the pattern or color that you do want... Then after you click DO NOT WELD you  can then let them touch and they will keep their own patterns.


I then separated them again and decided that I wanted the pattern larger, Under the colors and patterns tab on the left choose colors and patterns. You will then see two boxes with an arrow in between them. If you click the box on the right it will make the pattern larger as shown below. If you want to make it smaller click the image on the left to make it smaller. You can also use the arrows right next to those boxes to move the pattern where you want.... For example if there is a word in a pattern i can move the pattern left or right to get the word where I want it...


Then I made the pattern larger on the left using the same process.


I then clicked combine and put my image back together. You do NOT have to put them back together you can leave them as two images and print and cut separately.


I hope you learned something new today. Here is what the Design team has made to share today.

Jenny R made this card with her Imagine and Nursery Tails.... Visit her blog to see how she did it.

Melissa made this with Best Friends and Her Imagine machine!

 
Dont forget I am having our Countdown to Christmas where I am giving away a cartridge a week from now until Christmas. The only way to win is to comment here in my blog. I will choose a winner at random from all of the comments that week.