Craftsy Unlimited FREE 7 day trial at Craftsy.com
Happy Cloud Quilt Batting by Fat Quarter Shop
Cricut is Easy as 123
Loralie Designs
Showing posts with label K. Andrew Stamps. Show all posts

Saturday, December 24, 2011

25 days of Christmas, December 24, 2011 Theme - SANTA


Today's theme is SANTA

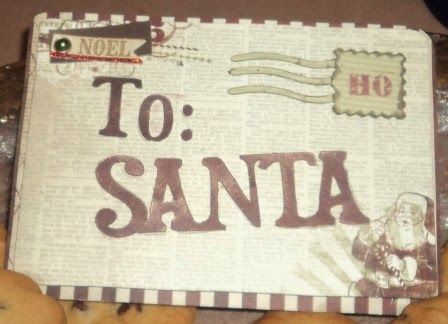
I made a very QUICK card. I guess this is actually a post card.

We are getting ready for Santa, we want to make sure he knows that this is for him.


This was cut from 'Tis the Season Cricut Cartridge at 4" I used My Mind's Eye Paper.
I used the Winter Wishes, K. Andrew Designs stamp set for the "HO" on the stamp.


These embellishments are my Mind's Eye and the Cross is from New Testament Cricut cartridge. It was cut at 2 3/4" Then i used foam dots to make it 'pop'. I also used glitter embossing powders for the Cross to match the MME embellishments. I used the Winter Wishes K. Andrew stamps for the "THANKS"
I wanted to thank God for giving us Jesus for our Christmas. So one side says Santa, but I don't ever want Bella to forget WHY we have Christmas. That is why it says "Thanks"

Here is the entire stamp set that I used

Make sure you visit, Getting Cricky to see this and many other great stamps sets. http://www.gettingcricky.com/p/products-stamps.html

If you comment here today you will be entered to win today's giveaway, a set of K. Andrew Design Stamps. I cannot remember which set I pulled out for the giveaway, but they are all great! Just comment here and you are entered to win a set of her stamps!


Here are the rest of the projects by the Design Team.... Speaking of which....
Monday will begin the Design Team call!


Connie W. made this Wall Hanging Decoration using the Jolly Holidays Cricut Lite Cartridge.
Please visit her blog at http://conniecancrop.blogspot.com


Connie W. made this scrapbook layout using the Jolly Holidays Cricut Lite Cartridge.
Please visit her blog at http://conniecancrop.blogspot.com


Kathy made this card using the Christmas Solutions Cricut Cartridge.
Please visit her blog to see how she made it http://3spoileddogs.blogspot.com


Ashley made this card. Her blog is http://theglamoroussideofscrapping.blogspot.com
Winter Frolic and Birthday Bash cricut cartridges used.


Kym used Snow Angel Cricut Imagine cartridge to make this card. Please visit her blog to see the finished project. http://kimmyskards.blogspot.com


Doris has created a card with Santa Using the Imagine Cartridge, Santa's Village. 


Tonya made this Santa key shadowbox using the Winter Frolic Cricut cartridge.
You can find the details on her blog ittybittyladybugs.blogspot.com

Friday, December 23, 2011

25 Days of Chrsitmas December 22, 2011 Theme- Gingerbread


Today's Theme is Gingerbread...
I hope you brought your sense of humor today at least for my project ;)


I used "Tis the Season to make this I cut the gingerbread man at 2 3/4"  
This is a plastic triangle bag, It has hot chocolate in the bottom, on the back o f the tag it tells you to snip the bottom of the bag and get the hot chocolate out and it will make 3 cuts, then undo the twist tie on the top to get the marshmallows out. I do recommend a damp paper towel to wipe inside the bag above the hot chocolate. I didn't like how it colored the bag where the marshmallows were, it looked dirty and the hot chocolate mix stuck to the marshmallows. So I wiped it clean before adding the marshmallows.

This is with the little elf giving gingerbread shaped (and flavored) marshmallows as an extra treat. I think this is funny because it is giving gingerbread men with their parts all together and the one on the card says,
"Need an extra hand" in a way mocking the gingerbread guy.... Ok, it was funny to me, at least.

The card itself was just cut at 3 1/2" x 3" I then rounded the corners. I used copper embossing powder for the edge of the cream card and on the words "Need an extra hand" I also used the same embossing powder for the gingerbread man, BUT, I added the clear gel crystals to the gingerbread man while the original was recently heated and still warm. It creates a "wet" look or grainy, it looked more like a real cookie than a smooth gloss would. I then used White Liquid Pearls for the accent on my little guy, but I then wiped them out, so it gives it a tint but not a stark white look, I didn't thing it would look right with a champagne colored card. For the card, this was plain solid colored paper that i used for the card. Then I used Beige chalk Versa color ink to make lines on it. Then I used start dust Gelly Roll pen to define the sparkle lines. I didn't want perfect lines so I did it all by hand. I wanted some thick and some thin ones.

Don't forget with stamps you can always ink part of the stamps and only have part of it inked when you apply it, don't forget you can make your own sayings for stamps, only ink the words you want.
The possibilities are endless.

This was made with the K. Andrew Designs Pirate Tales and Fish Scales Stamp set.... different I know.
Here is the entire set of stamps. I am also on her Design Team, she has amazing things planned for 2012 as well! I can't wait to share it all!


Enjoli used gingerbread and George and basic shapes Cricut cartridges.


Jen L used her Cricut to make the decorations for her outdoor house
to see how she made this go to her blog www.mybusycraftylife.com
  Today's theme is Gingerbread but my full time Design Team had the option to stick with out original theme, of Beach.... I love this, warmed me up inside!

Tammy S used the Life Is A Beach and Accent Essentials carts for her card. Please visit her blog at http://thepurplemuse.blogspot.com  to see how she created it.


Kathy made this card using Paper Doll Dress Up Cricut Cartridge.
Please visit her blog to see how she made it http://3spoileddogs.blogspot.com/


Jamie A  From My Kitchen, My Community, Winter Frolic, Stretch Your Imagination.
Please visit her blog http://scrapqueen141.blogspot.com/


Tonya made this card using Peachy Keen Stamps and the Winter Frolic Cricut cartridge.
You can find all the details on her blog ittybittyladybugs.blogspot.com 


Jennie made this scrapbook layout with Christmas, Storybook and From My Kitchen Cricut Cartridges to make this project. She used 2 different K. Andrew Design stamp sets today!
Please visit her blog http://jenscrapstoo.blogspot.com/ 


Jessica used the winter frolic cricut cartridge to make this Christmas card.
Check out her blog at http://www.Inspiremepink.com


Marji used Stretch your Imagination to make this ornament and this card please visit her blog  www.fstampaholic.blogspot.com


Amber made this yummy treat with Paper Dolls Dress up. 


Monday, August 8, 2011

My IMAGINE-ation Monday August 8, 2011

Welcome to August 8th's edition of My IMAGINE-ation Monday

Just so you know what we try to do on Mondays. There are 3 things that we like to do on Mondays....
1. We use either an Imagine cartridge with the E2 (Cricut Expression 2) which uses the ART Imagine cartridges, the E2 does not use the Colors and Patterns Imagine cartridges. So we can cut out a shape from one of the Imagien cartridges, using the paper that the imagine prints, so adding our own paper and choosing to CUT ONLY on the Imagine, but we used the Images from the cartridges.
2. We can print paper on the Imagine and then use it how ever we would like. I am going to print some papers and send them to certain members on the design team to use however they would like.
3. We use the colors and patterns on the Imagine Cartridges to cut out Images from the cartridges. Sometimes you will see me take a pattern from one cartridge and use it to fill and image from another Imagine Cartridge. This is how you Cashe a pattern from one cartridge to the next.....
    You can use up to 3 patterns from cartridges to use on one Art cartridge.
    The cartridge that you want to use the images from will be the last cartridge that you will put into the Imagine
    Here is how to do it, turn you Cricut Imagine ON, wait for it to load.... Then choose Print and Cut. Then select any image either from the Imagine's preloaded shapes or from an Imagine cartridge or a classic cartridge. YOU DO NOT HAVE TO USE THIS IMAGE for anything, just select it so you can access the patterns. Then scroll to the right to select the pattern that you want to use. When you get to it, use your stylus to hold it down on the pattern you want, then a box will pop up, it will say in green CASHE, tap the box, then that pattern is loaded....
   DO NOT TURN OFF THE MACHINE..... if you want to select another pattern from that cartridge scroll to the next pattern that you want to use. Then do the same thing, hold down the stylus until the box pops up again. Then tap it to confirm.
   When you are done with that cartridge DO NOT TURN OFF THE MACHINE, remove the cartridge and insert the next one that you either want a pattern off of or want to use the previous pattern to fill the image.
   Then select any image either from the Imagine's preloaded shapes or from an Imagine cartridge or a classic cartridge. YOU DO NOT HAVE TO USE THIS IMAGE for anything, just select it so you can access the patterns. Then scroll to the right to select the pattern that you want to use. When you get to it, use your stylus to hold it down on the pattern you want, then a box will pop up, it will say in green CASHE, tap the box, then that pattern is loaded.... If you scrool even farther to the right, you will see the patterns that you have already picked.
    You may repeat this process for up to three cartridges, then on the fourth that is where you have to insert that cartridge that you want to use the art (shapes) from. If you are using a classic cartridge you should already have it on the left spot of the Imagine machine.
   Select the image that you want, then in the top left of the box there is a Green pencil, touch it with your stylus, then when the new screen comes up scroll to the right to select the pattern that you want to use.
   You may also open an image then on the top left, touch seperate and then touch the image that you want to chabge, I have dont this below, you know you have that image selected because there will be a white box around it, then on the left it will show you a preview of what it will look like when it is all together. If you dont like it on the bottom left click UNDO, if you have made several changes and have no idea how to get back to the original colors, just tap REVERT, it is toward the middle on the bottom slightly left of center.

  I hoped this helped you use your Imagine a little bit more or to help you use it to its full potential :) I will be giving tips on Mondays to help you with your Image or Imagine Cartridges on your E2


This week's sponsor it Getting Cricky with K. Andrew
She has given me a wonderful set of stamps to use and one to GIVE AWAY TO YOU!
Make sure you comment on here everyday this week to be entered to win them ! I love them, they are a great quality, they make such beautiful clear images when inked or embossed! I have done both with them already (See my Hello Kitty Card from Saturday's blog hop to see how I embossed with them :) There are so many great stmap companies out there, when I find a company that I like, I feel the need to buy them all (over time) Well Ihave put one of my other stamps collections on hold.... I NEED more of these! She has 3 more new sets too! Make sure to go to her blog to see them all. The best part is (as if I needed more great things to love these) She makes a donation to a charity with each set she sells AND they are made in the USA~


Here is my finished card. I used the Cricut Imagine cartridge Kate's Kitchen to make this. This was cut at 4"
I then used the Sew Easy and Sew Easy twine to hand stitch around the image. The sun has two layers and I used foam pop dots to make it dimentional. I also like to use a corner rounder on my cards it is a little something that just seems to finish them off!
Here is a close up so you can see how nice and clear the stamp came out when
I used the VersaMagic Chalk ink


Lezyle used the Cricut Imagine Cartridge
YUMMY to make this adorable card. 
She used this a while ago but has other great things to see on her blog today! 


Samantha is a new member to my design team, and I love having her, just look as see why!
She used the Cricut Imagine Cartridge YUMMY.... I think we have a few fans of that cartridge here, what do you think?
To see this and other great things that she has made,
please visit her blog!


Heather F used some of my favorite Cartridges. Sophisticated is not an Imagine cartridge, for those of you who loves these images.
She used the Imagine cartridge Black and White
for the colors and patterns.
She makes such lovely cards all of the time, go to her blog to see that and everything else that she makes.
www.papercrafteranonymous.com


Jenny R has made this with one of my favorite Imagine cartridges, Imagine More Cards.
She is another new member to the design team, make sure you visit her blog to see everything else that she does! http://myimagitivity.blogspot.com
 

Please dont forget to come and comment here EVERYDAY this week to be entered to with the set of K. Andrew stamps!
If you have trouble commenting, please when you sign into blogger make sure the 'stay signed in' box is NOT checked.