


Here is a great tutorial and
FREE Cricut Design Space files to go with it.
The designs used are FREE in Design Space and Cricut Craft Room.
So ANYONE who has a cricut and a computer you can use these.
You can also put them on your gypsy if you don't connect your cricut to the computer.
This is a tutorial for paper, images are attached for visual reference.
Photo Matting Tutorial
Now on to photo matting and saving paper. Or getting the most out of your paper...
I love this technique especially when I am making scrapbooks or mini-albums.
But this is a great tip for card makers too. (at least I think so)
So the basic idea to this tutorial is to make use of the paper that will end up being covered by other stuff, typically pictures....
Here is a sample to show a functional project using this paper saver method.
Here is the link to this mini album if you want to see the rest of it.
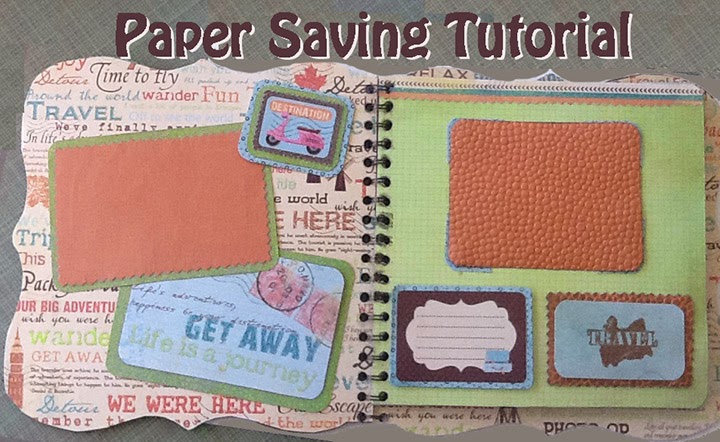
So in the example above you can see how there are multiple layers to the images especially where pictures are going to go. I like to have borders on pictures, I think it makes them look so much better than just sticking them on a page or on just one color. But if I were to use a full sheet of paper I would use TON of paper on a scrapbook or mini album!!!
This is especially great for fancy or expensive papers.
On the left there is a cut out of a scooter. It has blue around it... guess where it came from...
You can see on the lower right side there is a brown cut out, behind it is blue. Guess where that other piece of blue came from... If you were to remove the brown die cut you would see the hole in the blue paper. So when I cut out a rectangle (or square for that matter) I cut out what is called a nested set of images. I then use those frames throughout my project. Even if you are making a card, if something is going to be covering it, why not cut it out and save it for later.
So how do you do that? Well I did the work for you and the Cricut design space files are attached. I used the Free Cricut Craft Room images, so you don't need to own the cartridge to use them.
I personally like rounded corners on my stuff, but I know some people like perfect sharp corners, so I made a set of nested rectangles with sharp edges and rounded edges.
Please use this color coded system for the measurements of the following images.
This is all based on a 4x6 photo. Which is the blue images below. The blue would be your photo.
I have also made these files to fit 8.5x11 paper and 12x12 sheets of paper.
Yep again trying to save your paper and get the most use out of each sheet :)
You are welcome!
These are the sizes of these nested frames
Yellow is 5.25x7.25
Red is 4.5x6.5
Blue 4x6 **
Green 3.5x5.5
Purple 3x5
Orange 2.5x4
Black 2x3.5
Grey1.5x3
Pink 1x2.5
**(this could be your photo or any 4x6 item)

Now if they were all to be cut as shown, above, each one would only be 1/2" thick,
to hard to add adhesive to and line up... way to much work for me.
So I sorted them into two sets. This way when they are cut they are 1" thick.
Much easier to add adhesive to. So I split them into two groups as seen below.

They are only color for size reference... When you cut the nested shapes and pull them apart, they will look like this. So you can see the open area of each frame. You might not use the small ones now, by why not thrown them in a bag or drawer for later. It gives you more use of your paper.

Or if you want letters cut out of a shape.
Card makers can use this is you want to cut out a shape in a card. You need to attach the shape or letters so that you will end up with the letters cut out where you want them and not on a blank part of the paper.
Put the images that you want to be cut (or drawn with the Explore) on top of each other.
Shown in Blue, purple and black. Ignore the red now. It is already a finished set.

Use your mouse to select all of the designs that you want together.
Then as shown below, the ATTACH is circled. Once you click it. It will turn all of those colors one color. Now your image is attached and it will cut it as shown.
If you select WELD next to attach it gets rid of all of the lines on the inside and welds it into one design. Great for joining letters. But not to get one image to cut out of another one.

To make sure that your image will cut as shown. See below where it says Attached set.
that is the attaching process. 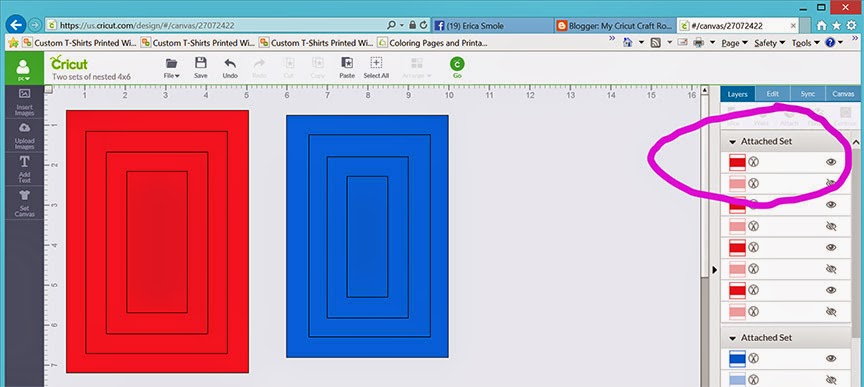
FREE FILES
Below are just some customized files already made for you so that you don't have to do all of the work and change the sizes. I have already done it for you.
This is your basic frame for a 4x6 photo with two borders.
Nested for 4x6
The tan one is 4x6 just to show special relation and how the sharp edges fit into the rounded edges.
These have NOT been welded. They will cut individually
The tan one is 4x6 just to show special relation and how the sharp edges fit into the rounded edges.
These have NOT been welded. They will cut individually

Completed file for 4x6 photos for 12x12 paper
Completed file for 2 4x6 photo for 8.5x11 paper Not nested.
https://us.cricut.com/design/#/canvas/27073102
Here is the file if you just want to cut out 2 4x6 photo mats
Nested Blue Frames for 8.5x11
Nested Blue frames for 12x12
Basic Blue frames for 12x12 Not nested
https://us.cricut.com/design/#/canvas/27073382
I just wanted to fill in a 12x12 size paper. There are various sizes in here.
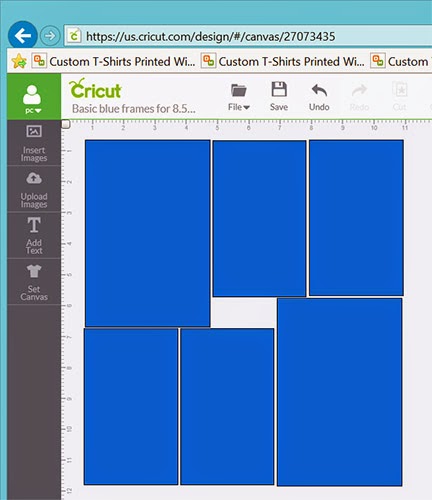
I just wanted to fill in a 12x12 size paper. There are various sizes in here.
Basic Blue Frames for 8.5x11 Not nested
Basic Red Frames for 8.5x11 Not nested
4x6 and 3x5 for 12x12 -This gives you two sets of nested shapes

Multi Color shapes rectangular and rounded edge Not nested
Yellow frames only

Larger and smaller welded Nested set of 4.5x6.5 and 4x6 Rounded edges

Red rounded for 8.5x11 4.5x6.5
Red rounded for 12x12 4.5x6.5
Blue rounded for 8.5x11 or 12x12
No comments:
Post a Comment