Craftsy Unlimited FREE 7 day trial at Craftsy.com
Happy Cloud Quilt Batting by Fat Quarter Shop
Cricut is Easy as 123
Loralie Designs

Saturday, September 27, 2014

My Cricut Craft Room's School Days Blog Hop


Thank you for joining us on My Cricut Craft Room's School Days Blog Hop


Today I made a Milk Carton to share with you. Using the new 123 Sesame Street Imagine cartridge. You cannot buy it, but you can use it in Cricut Design Space and Cricut Craft Room. I used Cricut Craft Room and my Imagine to print and cut. The milk carton design is a bonus shape on the Notebook Doodles Cricut Imagine Cartridge, then I used 123 Sesame Street to fill in another milk carton.
I also cut Elmo and the 123 Sesame Street sign. 
THe paper Airplane was from Notebook doodles. I just added it to the pictures while Bella and I were experimenting :) Bella is my daughter if you are a new follower to this blog. 


Next you will go to Dawn's Blog 


Start
6. Craft Lovers Come Here- http://CraftLoversComeHere.blogspot.com 
7. Eileen http://www.craftykards.blogspot.com


Please add your email to make sure that you get our email with our Daily projects....

You don't want to miss a thing with the great projects coming up.


Enter your email address:


Delivered by FeedBurner


Friday, September 26, 2014

Friday September 26, 2014 with My Cricut Craft Room and Design Team- Happy them


Friday September 26, 2014 with My Cricut Craft Room and Design Team- Happy theme

Hi Crafter Gloria Back With Another Card The Theme Is Happy. Gloria Used DCWV 2014 -The Pumkin Patch Paper Stack and 4 Cricut Cartridges here there are Best Of Pixar, 3Birds On A Parade, Birthday Bash, Disney Classics to created this card. For more Details Head over to Gloria's Channel Spyrorocks346 on YouTube, Don't Forget To Subscribe


 Her Face Is the Cutest And Let's Not Forget About That Adorable Bear


Here is the inside, very simple


Today Janis made a "Happy" card, I cut the mice from Disney's Happily Ever After cricut cartridge & it was so fun to put together. She was so pleased at how the Explore cut the tails out of the mice..... She wrote the sentiment with the Explore. She embossed the mat with the Divine Swirls cuttlebug folder. Inside the card it says 
"Clap Along if you know what Happiness is to you"

Hence the song 
"HAPPY"

To find out more about this card go to www.scrappergrl.blogspot.com 


Free Ustream class. Saturday September 27, 2014
7:00pm EST - FREE web tutorial for the Cricut Imagine! 
Yes I will record it incase you cannot watch it live. 
http://www.ustream.tv/channel/ericascraftroom 


And tomorrow's blog hop....


Upcoming blog hops...


Thursday, September 25, 2014

Thursday September 25, 2014 with My Cricut Craft Room and Design Team- Feisty theme


Thursday September 25, 2014 with My Cricut Craft Room and Design Team- Feisty theme


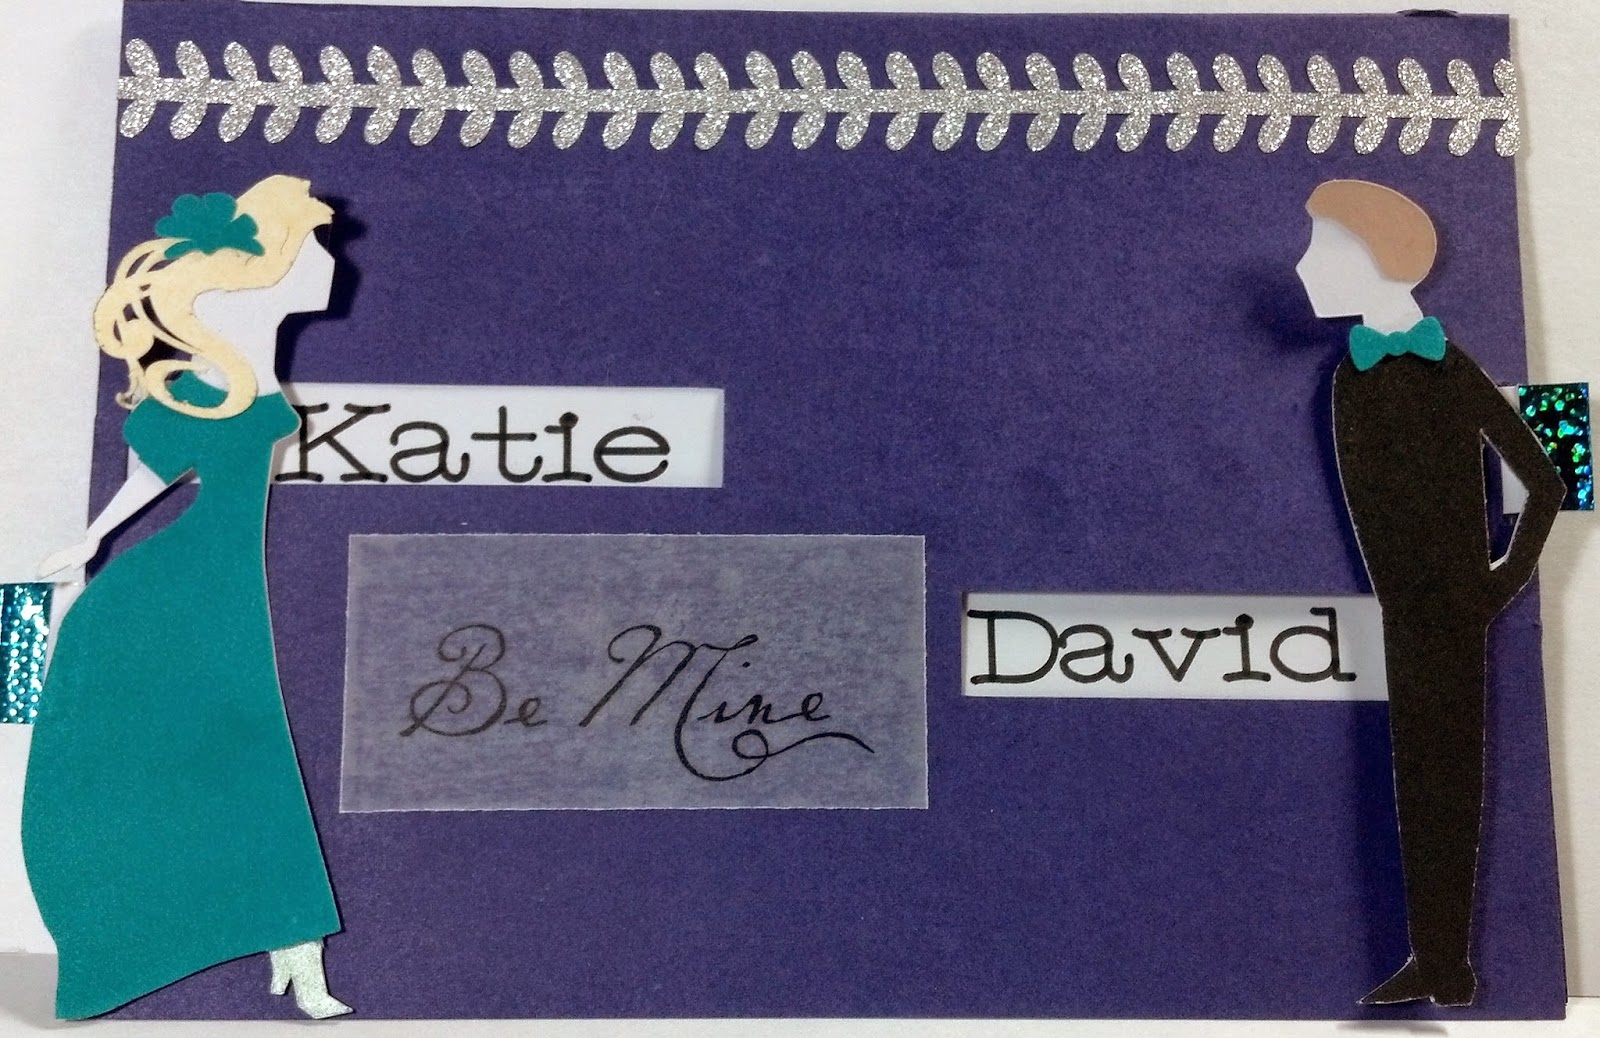
Create a Pull Tab Card with Shellie
Shellie loves mechanical cards!  Anything that pulls, pops, or moves is something special. 
 She decided to make a pull tab Save the Date Kissing Couple card for her project today.


Materials needed
White, Black and Purple Cardstock
Green Suede Cardstock
Washi Tape
Vellum Sentiment
Black Felt Pen


I started out by cutting out the svg file "Couple in Heart" downloaded from openclipart.org. 
I detached the heart from the figures, and cut out just the figures.


I picked a square greeting card image from my images, loaded it into Design Space and added windows for the pull tabs


. I used the felt pen to write in the sentiment and date on a separate insert card and on the pull tabs.( I decided against the heart flourish that you see at the top of the purple card.)


I then flipped the card over and slipped the pull tabs in the card and placed the stoppers in the correct position.  


To see a video tutorial of how I did this go here:
http://www.howcast.com/videos/499152-How-to-Attach-a-Pull-Tab-PopUp-Cards


I  assembled the card by attaching the white insert behind the front of the card, and then folding the card in half and gluing it together. I embellished the guy and the gal,  and used glitter washi tape at the top to give the card some bling.  I attached a vellum sentiment between the two figures.


Pull the tabs and you have a kissing couple!
Go on, Craft on!
Please join my Facebook page to see all of my projects and to meet other crafty people.


Wednesday, September 24, 2014

Wednesday September 24, 2014 with My Cricut Craft Room and Design Team- Smarty theme


Wednesday September 24, 2014 with My Cricut Craft Room and Design Team- Smarty theme


Rebecca created a fun "Back to School" party using Birthday Bash and Recess carts. 
You can check out more about her project at her blog Mommiedom:


Tuesday, September 23, 2014

Tuesday September 23, 2014 with My Cricut Craft Room and Design Team - Classy theme


Tuesday September 23, 2014 with My Cricut Craft Room and Design Team - Classy theme


Dina created a Glitter stemed wine glass using a split monogram letter and a childs year font.
To see more visit http://aldinarosedesigns.blogspot.com


Jen used Cricut vinyl and the Soiree Letting font to create a personalized pencil case to hold all those fun Cricut pens and tools. This is a "fabulous" project you can make in under 30 minutes! Read the full tutorial on her blog: 100Directions.com

Monday, September 22, 2014

Sunday September 21, 2014 with My Cricut Craft Room and Design Team- Pick a theme


Sunday September 21, 2014 with My Cricut Craft Room and Design Team- Pick a theme

What better way to celebrate a birthday, then by doing a theme that is unusual? For a 2nd birthday party theme, Sonja decided to do a little stinker theme for her daughter. Why? Well she's a little stinker! Cute, but a 2-year-old stinker who is growing up faster than what she is supposed to! 

The skunk is from Cricuts Create a Critter cartridge. 


For favors for the girls, Sonja created these explosion box purses and stuffed them with bracelets, whistles, rings, and other girly things. 


As a personalized favor to each child, Sonja took some vinyl and tumblers and added each childs name and favorite things to do. The boys tumblers were stuffed with cars and candy.

Add a banner and some placement cards and it is a party!

No birthday party would be complete without thank you cards!


Saturday, September 20, 2014

Welcome to My Cricut Craft Room's All Autumn Ideas Blog Hop....


Welcome to My Cricut Craft Room's All Autumn Ideas Blog Hop....

You will find many WONDERFUL Autumn ideas along this hop today... Enjoy! 


I made this super quick card.... I cut the card as a square of 6" Then cut Orange paper at 5.5"
Then the small word print and stripes at 4". Purple and Brown at 3" and the purple and blue owls at 2" THen I added the green which was the back side of scrap. I added some little embellishments and rounded the corners of each paper. Then I added each square in the middle of the one before it. They just over lapped. There are countless Cricut cartridges with a square and you could use any one of them! Happy Crafting. I used DoodleBug papers.
 I also inked the edges to make the colors pop and stand out. 


Next you will go to Rebecca's Blog 


Start
5. Trish Carrier http://Ifieverdoit.blogspot.com  
7. Craft Lovers Come Here- http://CraftLoversComeHere.blogspot.com 

Friday, September 19, 2014

Friday September 19, 2014 with My Cricut Craft Room and Design Team- Any type of embossing


Friday September 19, 2014 with My Cricut Craft Room and Design Team- Any type of embossing


Dina created a scene card using one of her own svg files she createdalong with nates ABC, Zooballoo and her cuddle bug and design space.to see more on how this was created got to http://aldinarosedesigns.blogspot.com


Karen created a gift card 
Cricut Cartridge used was Picturesque ~  Butterfly Tag page 58 
To see more on how this was created go to http://countrygirl-karen.blogspot.com.au/


Thursday, September 18, 2014

Thursday September 18, 2014 with My Cricut Craft Room and Design Team- Emboss Metal, Create a Steampunk Trunk Gift Box With Shellie


Thursday September 18, 2014 with My Cricut Craft Room and Design Team- Emboss Metal

Create a Steampunk Trunk Gift Box With Shellie
If you have teenagers in the house, then chances are you are familiar with the term Steampunk. In short, Steampunk is a literary genre and can be described as being inspired by 19th century industrial civilization, with elements of fantasy, and futuristic inventions. Think of Jules Verne. I was inspired to make this Steampunk Trunk gift box after I read a steam punk novel.

I created this Steampunk gift box using these Cricut cartridges: Box it Up, Robot Party, Ornamental Iron 2 and Sentimentals. I also used a free svg file, and an embossing folder.


Materials
Cricut Explore cutting system
Aluminum- I used pop cans
2 sheets of DCWV  black cardstock
1 sheet of  Hot off the Press crocodile specialty cardstock
Cuttlebug Tiny Bubbles embossing folder
Glue of your choice


I started by cutting out a box from the Cricut cartridge "Box It Up" out of the black cardstock. There are many to choose from. I cut the box as large as I could, I wanted it big.  I cut the top out of the black crocodile cardstock.


I cut out everything except the box from aluminum pop cans. I used a free dragon svg file from openclipart.org.  I cut and embossed him using the Cuttlebug Tiny Bubbles embossing folder. I imported the lock image from the Cricut cartridge Sentimentals. After I cut the lock, I embossed it using the score tool on the Explore.  I used a permanent marker to color the  lock gold. Note: Make sure your mat is super sticky and clean and the aluminum is secure or the aluminum will catch and tear on the blade as it cuts. 


Next, I cut out my gears using the Cricut Cartridge "Robot Party"


I welded the number 7 inside this gear and then embossed it with the same embossing folder as the dragon.


I then created the straps for the trunk by welding 3 images together.  In Cricut Design Space I inserted these images: a square, and from the Cricut "Ornamental Iron 2" cartridge the Fleur de Lys Ornament image, and the Iron Swirl Ornament. I then placed them on the square which I re-sized and then I welded them together.


And finally I laid everything out and glued it on the box! 


It's ready to fill with a surprise and give to someone special!
 Go On, Craft On!
Shellie

Please become a fan of my Facebook page so you can see every project that I create.  It's a great place to come and meet other crafty people.