Here are my pages, but I cannot charge my camera at the hotel (I left the charger at home)
I started with a $1.50 mini album from Michaels. It is a 6x6 chipboard "book"
I used Jillibean Soup Southern Chicken Dumpling Soup Papers.
YES EASTER PAPERS
I also used the die cut sheet from the collection.
I used my Xyron adhesive runner and Scrapbook Adhesive foam squares.
Also some pastel buttons from Jo-Ann Fabrics.
I used Stampology Alphabet Stamps, Market Street Stamps Chillaxin set, and Inkadinkado Love and Friendship (Yes wedding stamps) I used a variety of dew drop Versamagic ink.
I used Creative Memories Divine Wedding cartridge to make this entire project.
YES, a wedding cartridge.... don't be afraid of them.
The phrases were cut at 1.25". As were the other items. I used Font #1 for "Handsome Boy" and welded it. I used Font #1 for Sweet Girl then welded it. I used the font tab on the left selected add text. Then I typed Sweet, clicked done. Then I click on the word and on the top tan tool bar I selected "Ungroup" then I clicked on the letter E and moved it to the left until it touched the W... I used this process for the other E and T. Then I selected all of the letters and then above I selected "Group." It put my word back together so I could move the word all at once, instead of trying to line up each letter. I used this process for the other words to make my own phrases.
Then I selected ALL of the items (Hold down CTRL+A or COMMAND+A for MAC users)
Then on the top bar I selected the FLIP key (it looks like this >I< )
It then flipped my items. WHY did I do this, so I could add adhesive to all of the letters VERY easily.... read on.
I then lined up my paper how I wanted it. Then REMEMBER to FLIP your paper over. So the pretty side or the one you want to see is face down on the mat.
Here is my paper flipped over. It might be hard to understand, because I used double sided paper (Sorry)
I cut my images.
I then used my Xyron Adhesive runner and applied adhesive where the words and phrases were.
I then removed the excess paper aroudn my design, I am still looking at my words backwards. But it allowed me to add adhesive to all of those tiny letters in a very easy way. How many times have you ripped letters trying to apply adhesive?
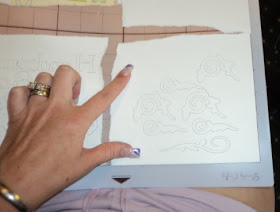
I did this again for you using white paper so you could see it better...
I carefully removed my words ONE at a time.
I added them to the base layer that I cut on another cutting mat.
Here is is put together with no adhesive sticking out and no torn letters.
I flipped it over and added the foam squares.
For the stamps. I place them on the paper and line them up THEN I put my clear block on the so they are right where I want them. Instead of trying to line up my stamp to the lines. I put then on the lines and then push my clear block on them so they are perfect.
Here you can see the clear block on it.
Here are the 'cards' I cut to go on the square pages.
Here is how I covered the pages...
I trace them in pencil and cut then out BEFORE I add the adhesive to put it on the book.
THEN my camera battery died.
I will have to post the rest of this on Tuesday when I get back home. I am so sorry!


Sorry about your camera. Looks great anyway. Thanks for showing the steps you took. ;)
ReplyDeleteappreciate the step by step description. Awesome project
ReplyDeleteBummer that the camera died. Nice project.
ReplyDeleteLooking great! Can't wait to see the finished project Tuesday. Sorry bout your camera! :(
ReplyDeleteWonderful Erica! Will look forward to seeing it all!
ReplyDelete:)
Sandy S
look so adorable! will be back on tuesday to see it.
ReplyDeleteLooks good so far Erica! Can't wait to see the rest!
ReplyDeleteMiranda :)
www.nanasscrapspot.com